一. 背景
最终决定用 Django 作为技术栈,本篇记录下自己的开发历程。由于本人才疏学浅,难免会有不足之处,希望各位留言指正共同学习进步。(本文参考《微信公众号开发WiKi》)
二. 开发环境搭建
1. 开发工具
(1). 系统开发环境:Windows 10
(2). IntelliJ IDEA 2019.02
(3). Python 3.7.2
(4). django 2.2.3
(5). 部署环境:Ubuntu 18.04.1 LTS \n \l
复制代码
2. 环境配置
2.1. python虚拟环境配置
# 安装虚拟环境配置工具virtualenv
pip install virtualenv
# 配置虚拟环境
virtualenv env
# windows激活虚拟环境
source env/Scripts/activate
# 如果时Linux环境,则使用下面的命令
source env/bin/activate
# 退出虚拟环境
deactivate
# 导出环境配置所需要的第三方库
pip freeze >> requirements.txt
复制代码
2.2. 配置django环境
# 安装
pip install django
# 创建django 项目
django-admin startproject WePublic
# 创建开发微信公众号app
cd WePublic
python manage.py startapp mypublic
复制代码
2.3. 代码管理配置
# 至于用什么代码管理工具就不管了
# 这里我用的是git + github, 配置什么的就不详细说了,这里只是配置下.gitignore文件
echo env/ >> .gitignore
echo __pycache__/ >> .gitignore
复制代码
三. 微信公众号配置
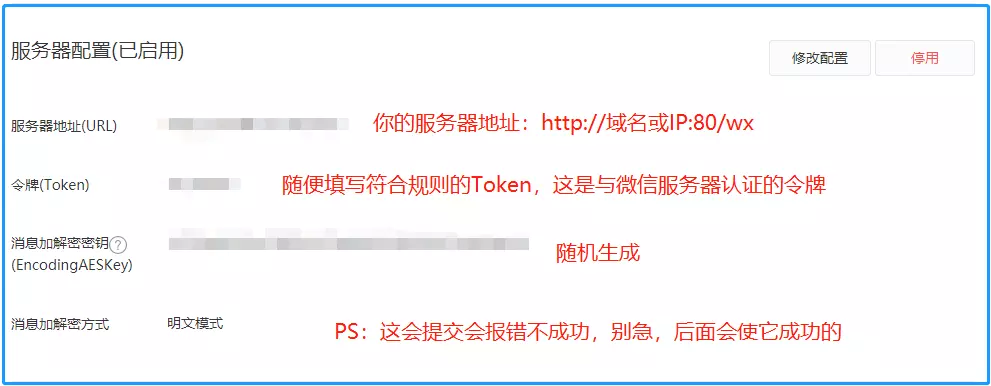
具体的微信公众号的申请就不描述了,我们这里直接进行开发配置。这会提交提交配置会报错,别急,因为你的配置还没和微信服务器进行交互呢!
四.微信服务器认证与服务开发
来先晒一下程序整体的目录结构,本着实用原则,后续会用到那进行那块的详细描述,Django 的其他用法后续会进行学习整理分享:
ubuntu@VM-0-8-ubuntu:~/WePublic$ tree -CF -L 2
.
├── db.sqlite3
├── env/
│   ├── bin/
│   ├── include/
│   └── lib/
├── manage.py
├── mypublic/
│   ├── admin.py
│   ├── apps.py
│   ├── __init__.py
│   ├── migrations/
│   ├── models.py
│   ├── __pycache__/
│   ├── receive.py
│   ├── reply.py
│   ├── tests.py
│   └── views.py
├── README.md
├── requirements.txt
└── WePublic/
    ├── __init__.py
    ├── __pycache__/
    ├── settings.py
    ├── urls.py
    └── wsgi.py
复制代码
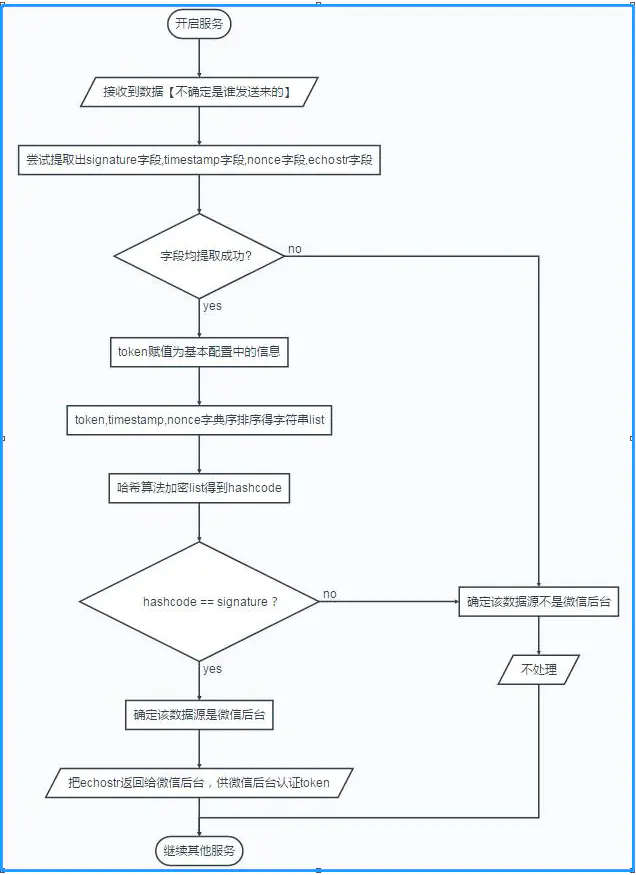
来再上一张微信微信消息发送的逻辑图:
1. 与微信服务器认证
根据上面的微信消息发送逻辑,要完成微信认证需要进行一下操作:
(1)接收到参数分别提取出 signature、timestamp、nonce、echostr 字段;
(2)将 token、timestamp、nonce 字段组成字典排序得到 list;
(3)哈希算法加密list,得到 hashcode;
(4)判断 signature 和 hashcode 值是否相等,如果相等把 echostr 返回微信后台,供微信后台认证 token;不相等的话就不处理,返回个自定义的字符串;
(5)认证成功后,就可以继续其他业务服务开发了。
复制代码# views.py
from django.shortcuts import HttpResponse
from django.views.decorators.csrf import csrf_exempt
import hashlib
# Create your views here.
# django默认开启了csrf防护,@csrf_exempt是去掉防护
# 微信服务器进行参数交互,主要是和微信服务器进行身份的验证
@csrf_exempt
def check_signature(request):
if request.method == "GET":
print("request: ", request)
# 接受微信服务器get请求发过来的参数
# 将参数list中排序合成字符串,再用sha1加密得到新的字符串与微信发过来的signature对比,如果相同就返回echostr给服务器,校验通过
# ISSUES: TypeError: '<' not supported between instances of 'NoneType' and 'str'
# 解决方法:当获取的参数值为空是传空,而不是传None
signature = request.GET.get('signature', '')
timestamp = request.GET.get('timestamp', '')
nonce = request.GET.get('nonce', '')
echostr = request.GET.get('echostr', '')
# 微信公众号处配置的token
token = str("你在微信公众号中配置的Token")
hashlist = [token, timestamp, nonce]
hashlist.sort()
print("[token, timestamp, nonce]: ", hashlist)
hashstr = ''.join(▼).encode('utf-8')
print('hashstr before sha1: ', hashstr)
hashstr = hashlib.sha1(hashstr).hexdigest()
print('hashstr sha1: ', hashstr)
if hashstr == signature:
return HttpResponse(echostr)
else:
return HttpResponse("weixin index")
elif request.method == "POST":
# autoreply方法时用来回复消息的,此时可以先将此处的两行代码修改成return "success"
otherContent = autoreply(request)
return HttpResponse(otherContent)
else:
print("你的方法不正确....")
复制代码接下来在服务器端部署代码并启动代码:
git pull github master
source env/bin/activate
pip install -r requirements.txt
sudo python manage.py runserver 0.0.0.0:80
复制代码
这会再在微信公众号开发配置页面,点击提交就可以配置成功了。
2. 解析发送文本消息
进行完微信服务器认证后,我们来实现“你说我学”,即用户发送文本消息给微信公众号,公众号模仿人发送消息返回给微信用户粉丝,不需要通过公众平台网页人为的操作。
2.1 解析接受的文本消息
微信接口的消息时以 XML 格式接受和传送的,所以首先进行接口消息的 XML 消息解析吧,具体的字段含义与用法请参考《官方文档》,此处就不再累述。官方文档参考
#!/usr/bin/env python
# -*- encoding: utf-8 -*-
"""
@File    :   receive.py
@Time    :   2019/8/6 10:15
@Author  :   Crisimple
@Github :    https://crisimple.github.io/
@Contact :   Crisimple@foxmail.com
@License :   (C)Copyright 2017-2019, Micro-Circle
@Desc    :   None
"""
import xml.etree.ElementTree as ET

def parse_xml(webData):
    if len(webData) == 0:
        return None

    xmlData = ET.fromstring(webData)
    msg_type = xmlData.find('MsgType').text

    if msg_type == 'text':
        return TextMsg(xmlData)


class Msg(object):
    def __init__(self, xmlData):
        self.ToUserName = xmlData.find('ToUserName').text
        self.FromUserName = xmlData.find('FromUserName').text
        self.CreateTime = xmlData.find('CreateTime').text
        self.MsgType = xmlData.find('MsgType').text
        self.MsgId = xmlData.find('MsgId').text


class TextMsg(Msg):
    def __init__(self, xmlData):
        Msg.__init__(self, xmlData)
        self.Content = xmlData.find('Content').text.encode('utf-8')

复制代码
2.2 组装被动回复的文本模板
我们上面解析了接受到了粉丝发送过来的消息了,解析完我们能拿到一些关键的数据字段(ToUserName、FromUserName、CreateTime、MsgType、MsgId),接下来可以把这些字段组装成回复消息的 XML 文件模板,具体的字段含义与用法请参考《官方文档》,此处就不再累述。官方文档参考
#!/usr/bin/env python
# -*- encoding: utf-8 -*-
"""
@File    :   reply.py
@Time    :   2019/8/6 10:15
@Author  :   Crisimple
@Github :    https://crisimple.github.io/
@Contact :   Crisimple@foxmail.com
@License :   (C)Copyright 2017-2019, Micro-Circle
@Desc    :   回复消息给关注微信公众号的用户
"""

import time

class Msg(object):
    def __init__(self):
        pass

    def send(self):
        return 'success'


class TextMsg(Msg):
    def __init__(self, toUserName, fromUserName, content):
        self.__dict = dict()
        self.__dict['ToUserName'] = toUserName
        self.__dict['FromUserName'] = fromUserName
        self.__dict['CreateTime'] = int(time.time())
        self.__dict['Content'] = content

    def send(self):
        XmlForm = """
        <xml>
        <ToUserName><![CDATA[{ToUserName}]]></ToUserName>
        <FromUserName><![CDATA[{FromUserName}]]></FromUserName>
        <CreateTime>{CreateTime}</CreateTime>
        <MsgType><![CDATA[text]]></MsgType>
        <Content><![CDATA[{Content}]]></Content>
        </xml>
        """
        return XmlForm.format(**self.__dict)
复制代码
2.3 自动回复粉丝的文本消息
接收到消息,如果判定消息类型未文本消息,条用autoreply方法解析 XML 文件,组装文本消息模板,将文本消息自动回复给粉丝。
特别提醒:假如服务器无法保证在五秒内处理回复,则必须回复“success”或者“”(空串),否则微信后台会发起三次重试。解释一下为何有这么奇怪的规定。发起重试是微信后台为了尽可以保证粉丝发送的内容开发者均可以收到。如果开发者不进行回复,微信后台没办法确认开发者已收到消息,只好重试。
# views.py

from django.shortcuts import HttpResponse
from django.views.decorators.csrf import csrf_exempt

import hashlib
from . import receive
from . import reply


# Create your views here.
# django默认开启了csrf防护,@csrf_exempt是去掉防护
# 微信服务器进行参数交互,主要是和微信服务器进行身份的验证
@csrf_exempt
def check_signature(request):
    if request.method == "GET":
        print("request: ", request)
        # 接受微信服务器get请求发过来的参数
        # 将参数list中排序合成字符串,再用sha1加密得到新的字符串与微信发过来的signature对比,如果相同就返回echostr给服务器,校验通过
        # ISSUES: TypeError: '<' not supported between instances of 'NoneType' and 'str'
        # 解决方法:当获取的参数值为空是传空,而不是传None
        signature = request.GET.get('signature', '')
        timestamp = request.GET.get('timestamp', '')
        nonce = request.GET.get('nonce', '')
        echostr = request.GET.get('echostr', '')
        # 微信公众号处配置的token
        token = str("Txy159wx")

        hashlist = [token, timestamp, nonce]
        hashlist.sort()
        print("[token, timestamp, nonce]: ", hashlist)

        hashstr = ''.join(▼).encode('utf-8')
        print('hashstr before sha1: ', hashstr)

        hashstr = hashlib.sha1(hashstr).hexdigest()
        print('hashstr sha1: ', hashstr)

        if hashstr == signature:
            return HttpResponse(echostr)
        else:
            return HttpResponse("weixin index")
    elif request.method == "POST":
        otherContent = autoreply(request)
        return HttpResponse(otherContent)
    else:
        print("你的方法不正确....")


def autoreply(request):
    try:
        webData = request.body
        print("Handle POST webData is: ", webData)

        recMsg = receive.parse_xml(webData)
        if isinstance(recMsg, receive.Msg) and recMsg.MsgType == 'text':
            toUser = recMsg.FromUserName
            fromUser = recMsg.ToUserName
            content = recMsg.Content.decode('utf-8')
            replyMsg = reply.TextMsg(toUser, fromUser, content)
            return replyMsg.send()
        else:
            print("暂不处理")
            return "success"
    except Exception as e:
        print(e)

复制代码
GitHub代码参考commits id:5f8581d 好的,下来就是在 Linux 服务器将该 Django 项目启动起来。为了测试我们发送的消息是否能被接受发送,可以调用 微信公众号文本接口网页调试工具,填写参数参考截图,成功调用接口返回成功结果显示如下图右半部分。
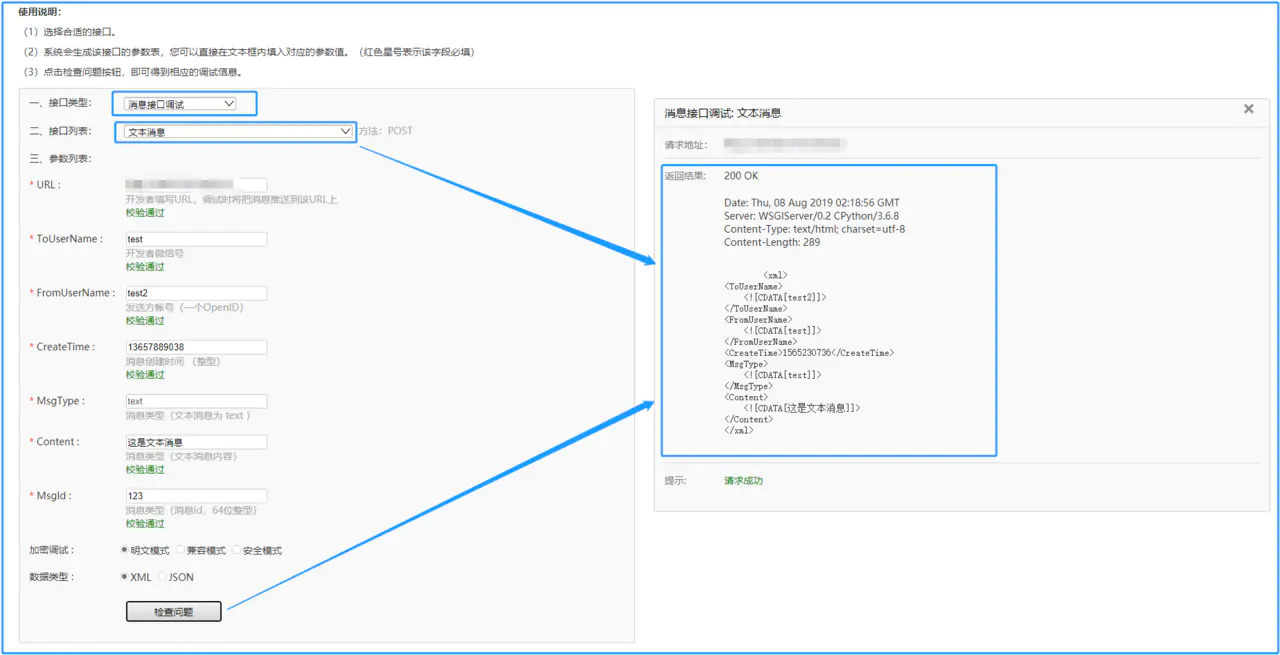
同样这时候给公众号发送文本消息可以得到自己想要返回结果,好哒,到这个阶段我们算是把微信公众号开发的初步阶段调试OK了。接下来我们继续进行更多服务的开发。

3. 解析发送图片消息
我们来实现“图尚往来”,即用户发送图片消息给微信公众号,公众号被动发送相同的图片消息给微信用户粉丝,不需要通过公众平台网页人为的操作。
3.1 解析接受的图片消息
微信接口的消息时以 XML 格式接受和传送的,所以首先进行接口消息的 XML 消息解析吧,具体的字段含义与用法请参考《官方文档》,此处就不再累述。官方文档参考
#!/usr/bin/env python
# -*- encoding: utf-8 -*-
"""
@File    :   receive.py
@Time    :   2019/8/6 10:15
@Author  :   Crisimple
@Github :    https://crisimple.github.io/
@Contact :   Crisimple@foxmail.com
@License :   (C)Copyright 2017-2019, Micro-Circle
@Desc    :   None
"""
import xml.etree.ElementTree as ET

def parse_xml(webData):
    if len(webData) == 0:
        return None

    xmlData = ET.fromstring(webData)
    msg_type = xmlData.find('MsgType').text

    if msg_type == 'text':
        return TextMsg(xmlData)
    elif msg_type == 'image':
        return ImageMsg(xmlData)


class TextMsg(Msg):
    def __init__(self, xmlData):
        Msg.__init__(self, xmlData)
        self.Content = xmlData.find('Content').text.encode('utf-8')


class ImageMsg(Msg):
    def __init__(self, xmlData):
        Msg.__init__(self, xmlData)
        self.PicUrl = xmlData.find('PicUrl').text
        self.MediaId = xmlData.find('MediaId').text

复制代码
3.2 组装被动回复的图片模板
我们上面解析了接受到了粉丝发送过来的消息了,解析完我们能拿到一些关键的数据字段(ToUserName、FromUserName、CreateTime、MsgType、MsgId、MediaId),接下来可以把这些字段组装成回复消息的 XML 文件模板,具体的字段含义与用法请参考《官方文档》,此处就不再累述。官方文档参考
#!/usr/bin/env python
# -*- encoding: utf-8 -*-
"""
@File    :   reply.py
@Time    :   2019/8/6 10:15
@Author  :   Crisimple
@Github :    https://crisimple.github.io/
@Contact :   Crisimple@foxmail.com
@License :   (C)Copyright 2017-2019, Micro-Circle
@Desc    :   回复消息给关注微信公众号的用户
"""

import time

class Msg(object):
    def __init__(self):
        pass

    def send(self):
        return 'success'


class ImageMsg(Msg):
    def __init__(self, toUserName, FromUserName, mediaId):
        self.__dict = dict()
        self.__dict['ToUserName'] = toUserName
        self.__dict['FromUserName'] = FromUserName
        self.__dict['CreateTime'] = int(time.time())
        self.__dict['MediaId'] = mediaId

    def send(self):
        XmlForm = """
        <xml>
        <ToUserName><![CDATA[{ToUserName}]]></ToUserName>
        <FromUserName><![CDATA[{FromUserName}]]></FromUserName>
        <CreateTime>{CreateTime}</CreateTime>
        <MsgType><![CDATA[image]]></MsgType>
        <Image>
        <MediaId><![CDATA[{MediaId}]]></MediaId>
        </Image>
        </xml>
        """
        return XmlForm.format(**self.__dict)

复制代码
3.3 自动回复粉丝的图片消息
接收到消息,如果判定消息类型为图片消息,条用autoreply方法解析 XML 文件,组装图片消息模板,将图片消息自动回复给粉丝。
特别提醒:假如服务器无法保证在五秒内处理回复,则必须回复“success”或者“”(空串),否则微信后台会发起三次重试。解释一下为何有这么奇怪的规定。发起重试是微信后台为了尽可以保证粉丝发送的内容开发者均可以收到。如果开发者不进行回复,微信后台没办法确认开发者已收到消息,只好重试。
# views.py
# ...

def autoreply(request):
    try:
        webData = request.body
        print("Handle POST webData is: ", webData)

        recMsg = receive.parse_xml(webData)
        if isinstance(recMsg, receive.Msg):
            toUser = recMsg.FromUserName
            fromUser = recMsg.ToUserName
            if recMsg.MsgType == 'text':
                content = recMsg.Content.decode('utf-8')
                replyMsg = reply.TextMsg(toUser, fromUser, content)
                return replyMsg.send()
            if recMsg.MsgType == 'image':
                # Issues1: 'ImageMsg' object has no attribute 'MeidaId'
                # Issues2: 发送图片返回了:qCs1WNDj5p9-FULnsVoNoAIeKQUfLsamrfuXn-Goo32RwoDT8wkhh3QGNjZT0D5a
                # Issues3: 'str' object has no attribute 'decode'
                # Issues4: '该公众号提供的服务出现故障,请稍后再试'
                mediaId = recMsg.MediaId
                replyMsg = reply.ImageMsg(toUser, fromUser, mediaId)
                return replyMsg.send()
            else:
                return reply.Msg().send()
        else:
            print("暂不处理")
            # return "success"
            return reply.Msg().send()
    except Exception as e:
        print(e)

复制代码
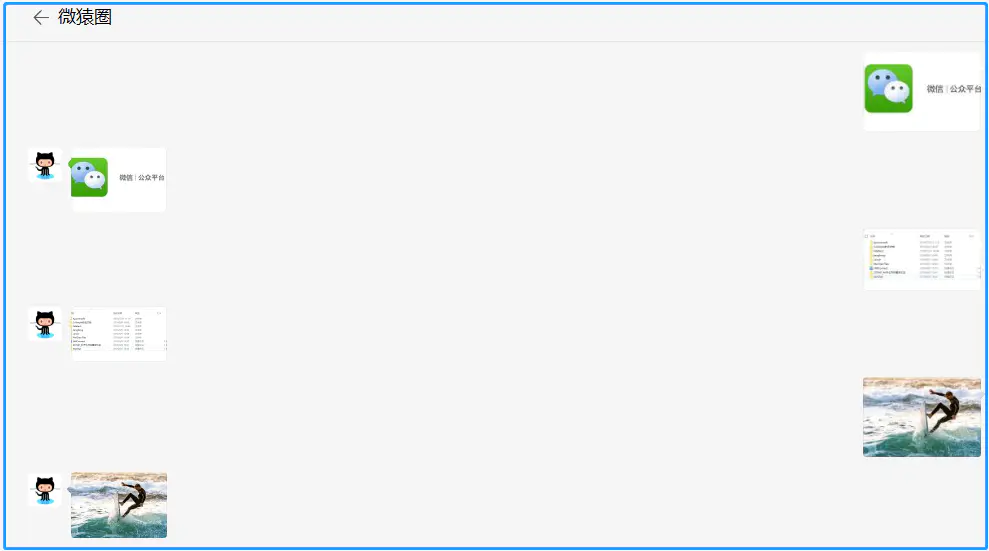
GitHub代码参考commits id:2425cab 好的,下来就是在 Linux 服务器将该 Django 项目启动起来。为了测试我们发送的消息是否能被接受发送,可以调用 微信公众号文本接口网页调试工具,图片信息接口的调试与文本消息的调试类似。以下是图片调试成功的实测效果截图。
4. 解析发送语音消息
我们来实现“鹦鹉学舌”,即用户发送语音消息给微信公众号,公众号被动发送相同的语音消息给微信用户粉丝,不需要通过公众平台网页人为的操作。
4.1 解析接受的语音消息
微信接口的消息时以 XML 格式接受和传送的,所以首先进行接口消息的 XML 消息解析吧,具体的字段含义与用法请参考《官方文档》,此处就不再累述。官方文档参考
#!/usr/bin/env python
# -*- encoding: utf-8 -*-
"""
@File    :   receive.py
@Time    :   2019/8/6 10:15
@Author  :   Crisimple
@Github :    https://crisimple.github.io/
@Contact :   Crisimple@foxmail.com
@License :   (C)Copyright 2017-2019, Micro-Circle
@Desc    :   None
"""
import xml.etree.ElementTree as ET

def parse_xml(webData):
    if len(webData) == 0:
        return None

    xmlData = ET.fromstring(webData)
    msg_type = xmlData.find('MsgType').text

    if msg_type == 'text':
        return TextMsg(xmlData)
    elif msg_type == 'image':
        return ImageMsg(xmlData)
    elif msg_type == 'voice':
        return VoiceMsg(xmlData)


class Msg(object):
    def __init__(self, xmlData):
        self.ToUserName = xmlData.find('ToUserName').text
        self.FromUserName = xmlData.find('FromUserName').text
        self.CreateTime = xmlData.find('CreateTime').text
        self.MsgType = xmlData.find('MsgType').text
        self.MsgId = xmlData.find('MsgId').text


class VoiceMsg(Msg):
    def __init__(self, xmlData):
        Msg.__init__(self, xmlData)
        self.MediaId = xmlData.find('MediaId').text
        self.Format = xmlData.find('Format').text

复制代码
4.2 组装被动回复的语音模板
我们上面解析了接受到了粉丝发送过来的消息了,解析完我们能拿到一些关键的数据字段(ToUserName、FromUserName、CreateTime、MsgType、MsgId、Format、MediaId),接下来可以把这些字段组装成回复消息的 XML 文件模板,具体的字段含义与用法请参考《官方文档》,此处就不再累述。官方文档参考
#!/usr/bin/env python
# -*- encoding: utf-8 -*-
"""
@File    :   reply.py
@Time    :   2019/8/6 10:15
@Author  :   Crisimple
@Github :    https://crisimple.github.io/
@Contact :   Crisimple@foxmail.com
@License :   (C)Copyright 2017-2019, Micro-Circle
@Desc    :   回复消息给关注微信公众号的用户
"""

import time

class Msg(object):
    def __init__(self):
        pass

    def send(self):
        return 'success'


class VoiceMsg(Msg):
    def __init__(self, toUserName, FromUserName, mediaId):
        self.__dict = dict()
        self.__dict['ToUserName'] = toUserName
        self.__dict['FromUserName'] = FromUserName
        self.__dict['CreateTime'] = int(time.time())
        self.__dict['MediaId'] = mediaId

    def send(self):
        XmlForm = """
        <xml>
        <ToUserName><![CDATA[{ToUserName}]]></ToUserName>
        <FromUserName><![CDATA[{FromUserName}]]></FromUserName>
        <CreateTime>{CreateTime}</CreateTime>
        <MsgType><![CDATA[voice]]></MsgType>
        <Voice>
        <MediaId><![CDATA[{MediaId}]]></MediaId>
        </Voice>
        </xml>
        """
        return XmlForm.format(**self.__dict)

复制代码
4.3 自动回复粉丝的语音消息
接收到消息,如果判定消息类型为图片消息,条用autoreply方法解析 XML 文件,组装语音消息模板,将语音消息自动回复给粉丝。
特别提醒:假如服务器无法保证在五秒内处理回复,则必须回复“success”或者“”(空串),否则微信后台会发起三次重试。解释一下为何有这么奇怪的规定。发起重试是微信后台为了尽可以保证粉丝发送的内容开发者均可以收到。如果开发者不进行回复,微信后台没办法确认开发者已收到消息,只好重试。
# views.py
# ...

def autoreply(request):
    try:
        webData = request.body
        print("Handle POST webData is: ", webData)

        recMsg = receive.parse_xml(webData)
        if isinstance(recMsg, receive.Msg):
            toUser = recMsg.FromUserName
            fromUser = recMsg.ToUserName
            if recMsg.MsgType == 'text':
                content = recMsg.Content.decode('utf-8')
                replyMsg = reply.TextMsg(toUser, fromUser, content)
                return replyMsg.send()
            if recMsg.MsgType == 'image':
                # Issues1: 'ImageMsg' object has no attribute 'MeidaId'
                # Issues2: 发送图片返回了:qCs1WNDj5p9-FULnsVoNoAIeKQUfLsamrfuXn-Goo32RwoDT8wkhh3QGNjZT0D5a
                # Issues3: 'str' object has no attribute 'decode'
                # Issues4: '该公众号提供的服务出现故障,请稍后再试'
                mediaId = recMsg.MediaId
                replyMsg = reply.ImageMsg(toUser, fromUser, mediaId)
                return replyMsg.send()
            else:
                return reply.Msg().send()
        else:
            print("暂不处理")
            # return "success"
            return reply.Msg().send()
    except Exception as e:
        print(e)

复制代码
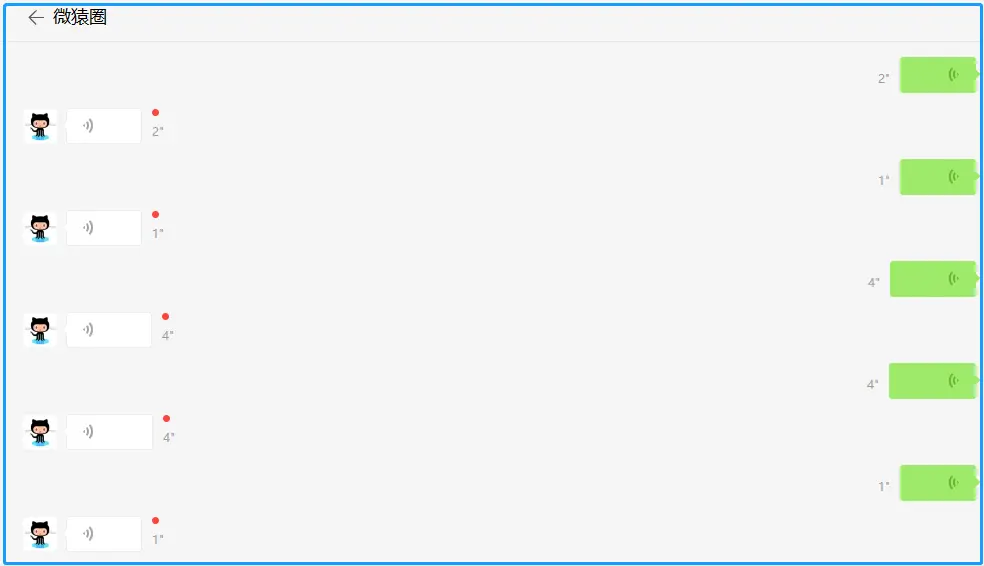
GitHub代码参考commits id:d435471 好的,下来就是在 Linux 服务器将该 Django 项目启动起来。为了测试我们发送的消息是否能被接受发送,可以调用 微信公众号文本接口网页调试工具,语音信息接口的调试与文本消息的调试类似。以下是语音调试成功的实测效果截图。
5.解析发送视频消息
我们来实现“鹦鹉学舌”,即用户发送语音消息给微信公众号,公众号被动发送相同的语音消息给微信用户粉丝,不需要通过公众平台网页人为的操作。
5.1 解析接受的视频消息
微信接口的消息时以 XML 格式接受和传送的,所以首先进行接口消息的 XML 消息解析吧,具体的字段含义与用法请参考《官方文档》,此处就不再累述。官方文档参考
#!/usr/bin/env python
# -*- encoding: utf-8 -*-
"""
@File    :   receive.py
@Time    :   2019/8/6 10:15
@Author  :   Crisimple
@Github :    https://crisimple.github.io/
@Contact :   Crisimple@foxmail.com
@License :   (C)Copyright 2017-2019, Micro-Circle
@Desc    :   None
"""

复制代码
5.2 组装被动回复的视频模板
我们上面解析了接受到了粉丝发送过来的消息了,解析完我们能拿到一些关键的数据字段(ToUserName、FromUserName、CreateTime、MsgType、MsgId、ThumbMediaId、MediaId),接下来可以把这些字段组装成回复消息的 XML 文件模板,具体的字段含义与用法请参考《官方文档》,此处就不再累述。官方文档参考
#!/usr/bin/env python
# -*- encoding: utf-8 -*-
"""
@File    :   reply.py
@Time    :   2019/8/6 10:15
@Author  :   Crisimple
@Github :    https://crisimple.github.io/
@Contact :   Crisimple@foxmail.com
@License :   (C)Copyright 2017-2019, Micro-Circle
@Desc    :   回复消息给关注微信公众号的用户
"""


复制代码
5.3 自动回复粉丝的视频消息
接收到消息,如果判定消息类型为图片消息,条用autoreply方法解析 XML 文件,组装视频消息模板,将视频消息自动回复给粉丝。
特别提醒:假如服务器无法保证在五秒内处理回复,则必须回复“success”或者“”(空串),否则微信后台会发起三次重试。解释一下为何有这么奇怪的规定。发起重试是微信后台为了尽可以保证粉丝发送的内容开发者均可以收到。如果开发者不进行回复,微信后台没办法确认开发者已收到消息,只好重试。
# views.py
# ...


复制代码
GitHub代码参考commits id: 好的,下来就是在 Linux 服务器将该 Django 项目启动起来。为了测试我们发送的消息是否能被接受发送,可以调用 微信公众号文本接口网页调试工具,语音信息接口的调试与文本消息的调试类似。以下是语音调试成功的实测效果截图。
