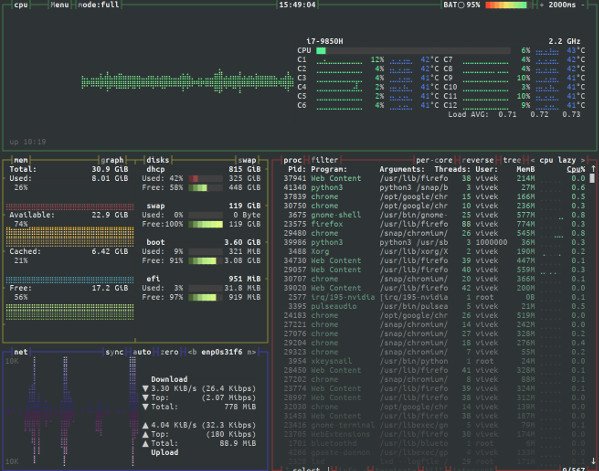
The bashtop is an impressive Linux resource monitor that shows usage and stats for processor, memory, disks, and network. However, it suffers from bash itself, and cross-platform support is a nightmare. Now we have the Python port of bashtop. We can use a resource monitor that shows usage and stats for CPU, RAM, SSD (hard disk), network, and processes information in a lovely format.

A handy ssh book for beginners and forgetful veteran developers and Unix/Linux/macOS users
bpytop – Awesome Linux, macOS and FreeBSD resource monitor
Not just the bpytop tool is impressive, but it offers tons of features. Here is a list of some of the features I found useful before we install awesome bpytop command on Linux, macOS and FreeBSD Unix:
- Extremely easy to use with gaming style menu system.
- Beautiful user interface.
- Full mouse support in its glory. We can scroll and click. The days are gone when you need to remember tons of keyboard shortcuts. Of course, we can use the arrow and other keys to control responsive UI.
- Various function keys to obtain in-depth statistics for running Linux, macOS, and FreeBSD process.
- Sorting and filtering processes supported with filters.
- We can also send various Unix signals to the selected process.
- The bpytop will do an auto-updating graph for your server’s network usage.
- Get a piece of quick information about current read and write speeds for your systems disk usage.
A note about software dependencies: It would be best to have Python3 (v3.6 or later) and the psutil module (v5.7.0 or later). Make sure you are using OpenSSH for a remote server running in clouds.
Installing bpytop
The best way to install the bpytop is by typing the following command to install or upgrade to the latest version:
$ pip3 install bpytop --upgrade
Arch Linux install bytop
Run the pacman command:
$ sudo pacman -Syu

$ sudo pacman -S bpytop
Related: How to run multiple commands with sudo on your macOS, Linux and Unix
Debian 11
We use the apt command:
$ sudo sh -c 'apt update && apt -y upgrade && apt -y install bpytop'
RHEL 8 or CentOS 8 or Fedora users
For RHEL 8 enable EPEL (see how to enable and use EPEL on CentOS 8) and then type the dnf command:
$ sudo sh -c 'dnf update && dnf install bpytop'
FreeBSD install bpytop
Run the pkg command to install bpytop:
$ sudo pkg install bpytop
Ubuntu snap installation
Execute the following snap command:
$ sudo snap install bpytop
However, you need to grant additional permissions too:
sudo snap connect bpytop:mount-observe

sudo snap connect bpytop:network-control

sudo snap connect bpytop:hardware-observe

sudo snap connect bpytop:system-observe

sudo snap connect bpytop:process-control

sudo snap connect bpytop:physical-memory-observe
Install bpytop on macOS using homebrew
Install install Homebrew on macOS if not already installed and then type the following commands:
brew install python3 git

python3 -m pip install psutil

brew install hacker1024/hacker1024/coretemp

brew install osx-cpu-temp

brew install bpytop
macOS users please use iTerm2.
How to install Linux, OSX and FreeBSD manually
Clone the repo and run:
git clone https://github.com/aristocratos/bpytop.git

cd bpytop

sudo make install
We can uninstall it if not needed as follows:
$ sudo make uninstall
How do I use bpytop?
All we have to do is type:
$ bpytop
And boom:

bytop running on my laptop powered by Ubuntu
That’s pretty great. Here is a quick video demo for you:
Want to start bpytop in minimal mode ?
Run the following to run in minimal mode without memory and networking info:
$ bpytop -p

# OR #

$ bpytop --proc
We can process information too:
$ bpytop -s

# OR #

$ bpytop --stat
Summing up
Today, try bpytop and let me know in the comment system if you found this fantastic utility useful on your Linux, macOS, and FreeBSD as resource monitor. It is much faster than bashtop and works pretty well as Python 3 is standard on many Unix boxes these days. Make sure you check out the project page too.